This article was written by using the MonitorWare Agent, but it can also be applied to EventReporter and WinSyslog.
By default the log files generated by MonitorWare Agent using the WriteFile Action are written on a daily basis, so you have one log file for each day. Over time this can become a huge number uncompressed log files, so you properly want to archive them automatically to save disk space. There is no inbuilt method in MonitorWare Agent yet to do so, but this article will describe how you can archive this goal by using the Windows Task Scheduler and WinRar.
- You can download the scripts needed for this article here, which you will need on your target system.
Table of Contents
1. Installing and Configuring MonitorWare Agent
1.1 Download and Install MonitorWare Agent
1.2 Setup up basic MonitorWare Agent configuration
1.3 Configure the Write File Action.
1.4 Start MonitorWare Agent
2. Configure log file archiving
2.1 Download and Install WinRar
2.2 Create VBScript which utilizes WinRar to create archives.
2.3 Create Task in Windows Task Scheduler
Final Thoughts
1. Installing and Configuring MonitorWare Agent
1.1 Download and Install MonitorWare Agent
| So if you haven’t done so already, go to www.mwagent.com and download the latest MonitorWare Agent version. It is always recommended to use the latest Version of MonitorWare Agent. Once the download is done, go ahead and install it. You may have to restart after installation, this depends on your system. |
1.2 Setup up basic MonitorWare Agent configuration
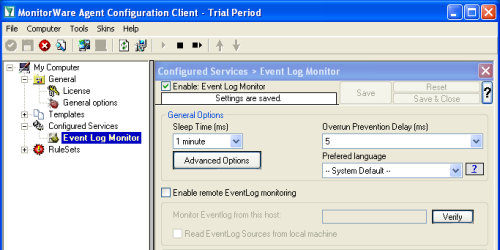 Start the MonitorWare Agent client and skip the wizard on startup. In this article, we will use an EventLog Monitor as source for our File logging, but you can use any other kind of source.Create a new “EventLog Monitor” service and just name it “EventLog Monitor”. You can leave all configuration settings as they are in the screenshot on the right. Start the MonitorWare Agent client and skip the wizard on startup. In this article, we will use an EventLog Monitor as source for our File logging, but you can use any other kind of source.Create a new “EventLog Monitor” service and just name it “EventLog Monitor”. You can leave all configuration settings as they are in the screenshot on the right. |
1.3 Configure the Write File Action.
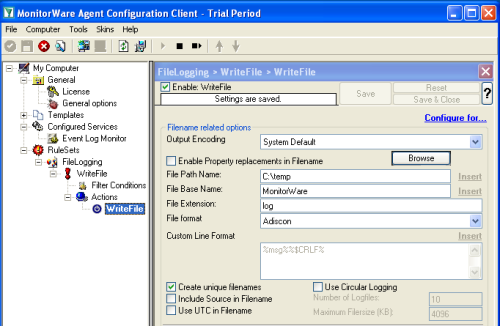 In order to create log files we need a Write File Action. Create a new Write File Action like in the screenshot on the right. The default settings will create daily log files automatically. You may customize the log format by using the custom “File format” option. It is important to have the “Create unique filenames” Option enabled, this will enable the daily written log files. In order to create log files we need a Write File Action. Create a new Write File Action like in the screenshot on the right. The default settings will create daily log files automatically. You may customize the log format by using the custom “File format” option. It is important to have the “Create unique filenames” Option enabled, this will enable the daily written log files.The log file name for 2008-11-28 would be MonitorWare-2008-11-28.log, and for the next day MonitorWare-2008-11-29.log and so on. |
1.4 Start MonitorWare Agent
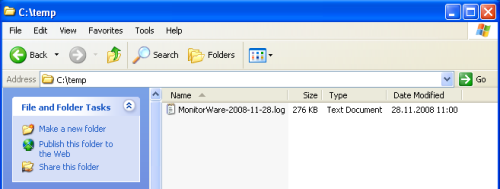 After you configured MonitorWare Agent, you can start the Service and verify that the daily log files are successfully written. After you configured MonitorWare Agent, you can start the Service and verify that the daily log files are successfully written. |
2 Configure log file archiving
2.1 Download and Install WinRar
 Visit the RarSoft website to download the latest Version of WinRar, if you haven’t installed it already. There are plenty of other packer applications out there and this article may also be used with them. However I will focus on using WinRar. Visit the RarSoft website to download the latest Version of WinRar, if you haven’t installed it already. There are plenty of other packer applications out there and this article may also be used with them. However I will focus on using WinRar.Once you downloaded WinRar, start it’s installation, and remember the exact path it was installed to. Usually this is “C:\Program Files\WinRAR” or “C:\Program Files (x86)\WinRAR”. |
2.2 Create a VBScript which utilizes WinRar to create the archives.
| This script will actually do the work for you. It is designed to automatically generate the filename of the log file from yesterday, and create an archive with the same name. If the archive is successfully created, the log file will automatically be deleted. The script is also in the script package which you can download at the top. You can also copy the script content from the textbox below, and create a new file archive_logs.vbs yourself. By default the script will create zip files, if you rather want to create rar files, just remove the -afzip parameter from the variable szCommand at the end of the script.
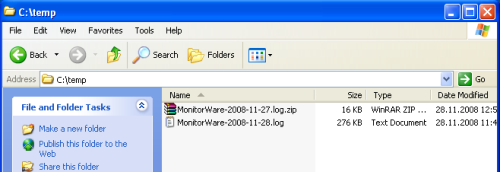
szWinRardirectory – contains the full installation of your WinRar installation Once you have done this, you should run the script at least once manually by double clicking it to see if it works. You may only notice a short popup of the WinRar Windows, depending if a log file to archive can be found, and archiving takes some time. If it works, you should see a zip-packed log file in your logs directory, like in this screenshot. |
 The next thing to do is to edit this script to your needs. There are 4 parameters at the top which you may need to customize, so the script fits into your environment.
2.3 Create Task in Windows Task Scheduler
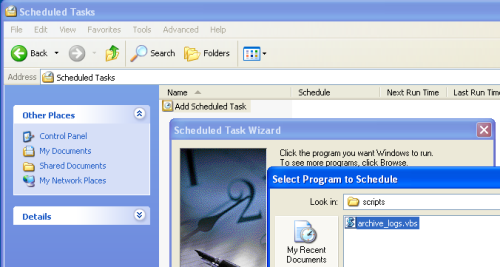 Open the Control Panel, and go to the scheduled tasks. From there you can create a new scheduled task using a wizard. Once the wizard is opened, click on browse to manually select the “archive_logs.vbs” script. Then proceed to the next step of the wizard. Open the Control Panel, and go to the scheduled tasks. From there you can create a new scheduled task using a wizard. Once the wizard is opened, click on browse to manually select the “archive_logs.vbs” script. Then proceed to the next step of the wizard. |
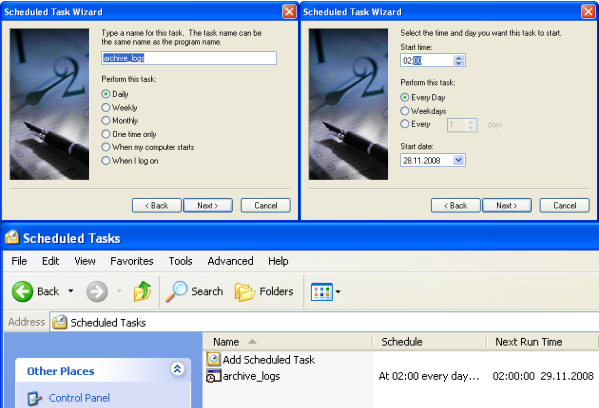 Choose “Daily”, and set the start time in the next wizard step. I have chosen 02:00 am in this article, but you can also chose 04:00am or 01:00am. It should not be 00:00am, because the script might archive the log file too early. Choose “Daily”, and set the start time in the next wizard step. I have chosen 02:00 am in this article, but you can also chose 04:00am or 01:00am. It should not be 00:00am, because the script might archive the log file too early.In the next step you have to configure the Username and Password, the task is going to run under. Once you finished creating the scheduled task, right click it in the task list and select “Run” in order to test that the task is working.
|
Final Thoughts
I hope this article will help you solving your tasks and shows you the potential of MonitorWare Agent, and what you can archive with it. Feel free to email me for recommendations or questions.